手書きBeansの超基本
JavaBeansでいうBeanは、「シリアライザブルであること」 など特定の条件を満たしたJavaのクラスです。 Beanの中には「目に見える」クラス、つまりAWTのCanvasやPanelの派生クラスや SwingのJPanelの派生クラスなども、 「目に見えない」純粋な業務ロジックからなるクラスも含まれます。 が、目に見えるBeanのほうが動作を確認しやすいので、 そういうのの簡単な例でまずは紹介してみます。
package ushi.sample2;

import java.awt.*;
import java.awt.event.*;
import javax.swing.*;
import java.beans.*;

public class BeanSample2 extends javax.swing.JPanel {

  class CheckedActionListener implements ActionListener {
    private JLabel la;
    public CheckedActionListener(JLabel la){ this.la = la; }
    public void actionPerformed(ActionEvent e){
      if( ((JCheckBox)(e.getSource())).isSelected() ){
	this.la.setText("つけられたよ");
      } else {
	this.la.setText("外れたよ");
      }
    }
  }

  public BeanSample2(){
    JCheckBox cb = new JCheckBox("チェック?");
    JLabel la = new JLabel("******");
    this.setLayout(new FlowLayout());
    this.add(cb);
    this.add(la);
    cb.addActionListener(new CheckedActionListener(la));
  }

  public Dimension getPreferredSize(){
    return new Dimension(100, 50);
  }
}
// end.
ファイル名はクラス名と同じBeanSample2.javaで決まりですが、 パッケージを宣言する関係上、ファイルの位置に注意する必要があります。 ここでは C:\home\watasi\ushi\sample2 の下に置きます。
以下、これをBeanにするには次のような手順をとります。
- ソースプログラムをjavacなどでコンパイルします。
「BeanSample2.class」などいくつかの.classファイルができたことを確認します。
% cd \home\watasi\ushi\sample2
% javac BeanSample2.java
- 「マニフェストファイル」を作ります。
これはファイル名はなんでもよいのでここでは「manifest-sample2.txt」
としますが、
必ずこの場合では C:\home\watasiの位置に置きます。内容は次のようにします。
Manifest-Version: 1.0

Name: ushi/sample2/BeanSample2.class
Java-Bean: True
- Java2 SDK付属のツールjarでJARアーカイブを作ります。
「sample2.jar」が作られていればOKです。
% cd \home\watasi
% jar jfm sample2.jar manifest-sample2.txt ushi\sample2\*.class
- BDKのBeanBoxで確認してみます。 「C:\Program Files\BDK1.1\beanbox\run.bat」 をダブルクリックするなどして起動します。
- メインウィンドウのメニュー「FIle」→「LoadJar...」
で先ほど作った「C:\home\watasi\sample2.jar」
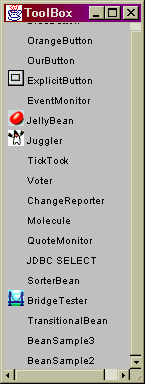
を選びます。Bean一覧の下にその中に含まれるクラスファイル名、
ここでは「BeanSample2」が現れればOKです。
ここの例ではちょっと先走ってBeanSample3というのもいっしょに出ていますが、
とりあえず無視してBeanSample2が出ているのを確認します。
- 確認しただけでは何なので、
画面に貼り付けてみます。
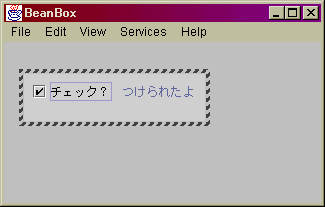
Bean一覧の「BeanSample2」をクリックすると、マウスカーソルが十字に変わるので、
その状態でメインウィンドウをクリックすると
BeanSample2が貼り付けられます。
プロパティを勝手に増やすには
BeanSample2には最初から「Font」や「Background」 などの「プロパティ」が用意されていますが、 せっかくなので、チェックボックス部分の文字の色を指定する「textColor」 や、ラベル部分の文字の色を指定する「labelColor」 などその他のプロパティもほしいところです。 Beanに新しいプロパティを作るのは非常に簡単で、次のような2つのメソッドをクラスに追加するだけです。
public データ型 getプロパティ名(){
    // このプロパティ値を返す
}

public void setプロパティ名(データ型 newvalue){
    // 新しいプロパティ値を保存する
}
「プロパティ名」は、通常最初の1文字は英大文字にするのが慣例です。
例を先に載せてみましょう。
package ushi.sample2;

import java.awt.*;
import java.awt.event.*;
import javax.swing.*;
import java.beans.*;

public class BeanSample3 extends javax.swing.JPanel {

  public JLabel    la;
  public JCheckBox cb;

  class CheckedActionListener implements ActionListener {
    private JLabel la;
    public CheckedActionListener(JLabel la){ this.la = la; }
    public void actionPerformed(ActionEvent e){
      if( ((JCheckBox)(e.getSource())).isSelected() ){
	this.la.setText("つけられたよ");
      } else {
	this.la.setText("外れたよ");
      }
    }
  }

  public BeanSample3(){
    this.cb = new JCheckBox("チェック?");
    this.la = new JLabel("******");
    this.setLayout(new FlowLayout());
    this.add(cb);
    this.add(la);
    cb.addActionListener(new CheckedActionListener(la));
  }

  public Dimension getPreferredSize(){
    return new Dimension(100, 50);
  }

  // ここからプロパティ操作メソッドです。
  public String getText(){
    return this.cb.getText();
  }

  public void setText(String newtext){
    this.cb.setText(newtext);
  }

  public synchronized Color getTextColor(){
    return this.cb.getForeground();
  }

  public void setTextColor(Color newcolor){
    this.cb.setForeground(newcolor);
  }

  public synchronized Color getLabelColor(){
    return this.la.getForeground();
  }

  public void setLabelColor(Color newcolor){
    this.la.setForeground(newcolor);
  }

  public boolean getChecked(){
    return this.cb.isSelected();
  }

  public void setChecked(boolean b){
    this.cb.setSelected(b);
  }
}
// end.
今度のBeanSample3クラスは、BeanSample2クラスに「getなんとか」 と「setなんとか」 というメソッドがいくつか加わったものです。この例では 「Text」「TextColor」「LabelColor」「Checked」 の4つのプロパティを定義していることになります。それらのデータ型はそれぞれ String, Color, Color, booleanなのがソースプログラムから分かるでしょう。
今度はBeanSample2とBeanSample3の2つを含むJARアーカイブを作りたいので、 マニフェストファイルには2つのクラスを記述します。 空行は必須なので注意が必要です。
Manifest-Version: 1.0

Name: ushi/sample2/BeanSample2.class
Java-Bean: True

Name: ushi/sample2/BeanSample3.class
Java-Bean: True
これでsample2.jarを作り直してみます。
% cd \home\watasi
% jar jfm sample2.jar manifest-sample2.txt ushi\sample2\*.class
これでBeanBoxからロードすれば、BeanSample2とBeanSample3が同時にロードされます。 つまり上のスクリーンショットのようになるわけですね。
ではBeanSample3をメインウィンドウに貼り付けてみます。 外見はBeanSample2と同じですが、 プロパティウィンドウに注目。



(uploaded 2000/11/19 and not ever modified, EK - Urano398)